
How to pass the American Football Physical Tests?
Passing the physical tests for american football will allow you to have a super complete profile for recruiters.
2 options are possible to pass the tests:
It’s free. You can pass the test alone and fill in your profile information with it.
You can pass the tests with Sport Combine’s team during one of our session. We film each player during the session to offer them a video of their performance and be able to add it on their profile.
We’ll communicate on the next coming sessions. If you want to organize a session with us it’s possible but you have to contact us first.
There is registration fees for the Sport Combine’s sessions.
You will find below all the informationss that you need to pass the tests.
Table of Contents
Overview
| Fitness Component | Exercise | Comments |
|---|---|---|
Strength |
225 pound Bench Press |
The maximum number of bench press repetitions at 225 pounds is recorded. This is a test of maximum strength and repetition (strength ) endurance . The test also requires excellent bench press technique to maximize the athlete’s score. |
Power |
Vertical & Broad Jump |
The vertical and horizontal jumps are 2 tests of an athlete ’s explosive leg power. |
Speed |
40 Yards Dash |
A pure test of speed, this drill times athletes as they explode out of a sprinter’s’ stance and accelerate over 40 yards. |
Agility |
L Test |
Agility is very important in Football, and is measured using the L-Test agility test at the NFL Combine. this test includes speed, quickness, flexibility, change of direction, body control. |
Agility |
20 Yards Shuttle |
This test is part of a fitness testing protocol for the NFL Combine Testing. It is also called the Pro Agility Shuttle or 5 10-5 Shuttle, as it involves running to 5 yards, back 10 yards, and back again 5 yards. |
Body Size |
Anthropometrical measurements that are taken include height with and without shoes, weight, wingspan and standing reach. Percent body fat has also been measured in the last few years. |
Bench Press
Purpose: To measure maximum strength endurance of the chest muscle groups.
Equipment required: Bench with safety, standard Olympic bar, and various free weights
up to 225 lbs.
Bench Press Testweight: In the pre-season draft testing combines, the NBA uses 185 lbs, NHL 150 lbs, and the NFL 225 lbs. In the SPARQ rating system for football, the weight used is 185 lbs.
Procedure: An appropriate warm up procedure should be followed. For the NBA combine protocol, the warm up involves 10 push-ups, then after 60 seconds rest, 5 reps at 135 pounds, then after another 90 seconds attempt 185lbs as many times as possible. The bar is set to the appropriate weight, depending on the group to be tested. The athlete begins by lying in a supine position on the bench, with their feet flat on the floor and the upper and lower back in contact with the bench at all times. The bar is grasped at approximately 6 inches wider than shoulder width apart, so that the elbows are at right angles at the lowest point. A complete successful lift is counted from the starting position of the arms fully extended with the weight directly above the chest, to the weight just touching the chest, then returned to the starting position. The movement of the bar should be at a controlled speed and with a smooth motion, and the weight should remain in line with your nipples. The testing ends as soon as the athlete is unable to complete a repetition.
Scoring: The maximum number of full repetitions successfully completed is recorded.
Comments: For safety, a spotter should stand at the head of the bench throughout the test. The test results of this test may be specific to the equipment used (height of bench, variations in weights), so is best to use the same equipment for test-retest measures. If any variation in technique was allowed, this should be recorded on the results sheet for referral when the test is repeated.
Vertical Jump
Purpose: To measure the leg muscle power
Equipment required: Measuring tape or marked wall, chalk for marking wall (or Vertec or jump mat).
Procedure: The athlete stands side on to a wall and reaches up with the hand closest to the wall. Keeping the feet flat on the ground, the point of the fingertips is marked or recorded. This is called the standing reach height. The athlete then stands away from the wall, and leaps vertically as high as possible using both arms and legs to assist in projecting the body upwards. The jumping technique can or cannot use a countermovement (see vertical jump technique). Attempt to touch the wall at the highest point of the jump. The difference in distance between the standing reach height and the jump height is the score. The best of three attempts is recorded.
Variations: The vertical jump test can also be performed using a specialized apparatus called the Vertec. The procedure when using the Vertec is very similar to as described above. Jump height can also be measured using a jump mat which measures the displacement of the hips. To be accurate, you must ensure the feet land back on the mat with legs nearly fully extended. Vertical jump height can also be measured using a timing mat. The vertical jump test is usually performed with a counter movement, where there is bending of the knees immediately prior to the jump. The test can also be performed as a squat jump, starting from the position of knees being bent. Other test variations are to perform the test with no arm movement (one hand on hip, the other raised above the head) to isolate the leg muscles and reduce the effect of variations in coordination of the arm movements. The test can also be performed off one leg, with a step into the jump, or with a run-up off two feet or one foot, depending on the relevance to the sport involved.
Scoring: The jump height is usually recorded as a distance score. See the vertical jump norm table to rate scores. For more information, see a selection of vertical jump test results. It is also possible to convert jump height into a power or work score.
Comments : The jump height can be affected by how much you bend your knees before jumping, and the effective use of the arms. As with many tests, motivation can affect results – you should provide encouragement to the participant to achieve their maximal score.
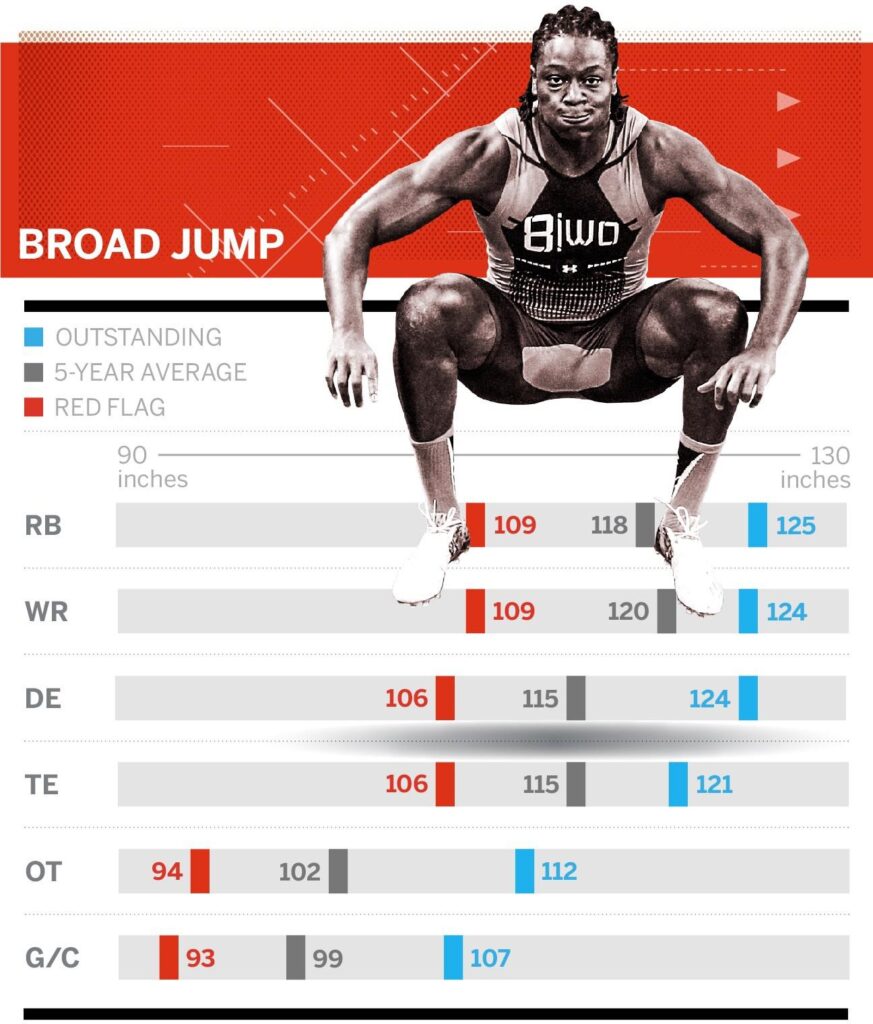
Broad Jump
Purpose: To measure the explosive power of the legs
Equipment required: Tape measure to measure distance jumped, non-slip floor for takeoff, and soft landing area preferred.
Procedure: The athlete stands behind a line marked on the ground with feet slightly apart. A two foot take-off and landing is used, with swinging of the arms and bending of the knees to provide forward drive. The subject attempts to jump as far as possible, landing on both feet without falling backwards. Three attempts are allowed.
Scoring: The measurement is taken from take-off line to the nearest point of contact on the landing (back of the heels). Record the longest distance jumped, the best of three attempts. The table below gives a rating scale for the standing long jump test for adults, based on personal experiences.
Comments: Falling or stepping backward after the landing will result in measurement to that point of contact rather than where the feet first touched. Some subjects will try to use a step at take-off, which is not allowed.
40 Yards Dash
Purpose: This is a test of speed and agility.
Equipment required: Measuring tape or marked track, stopwatch or timing gates, cone markers, flat and unobstructed grass, track, or turf surface of at least 60 yards.

Procedure : The test involves running a single maximum sprint over 40 yards , with the time recorded . A thorough warm up should be given , including some practice starts and accelerations. Start from a comfortable stationary 3-point stance position, a position that is most familiar to you and that you think will yield the best time. The front foot must be on or behind the starting line . This starting position should be held for 3 seconds prior to starting , you may lean across the starting line , and no rocking movements are allowed . The tester should provide hints to maximizing speed and encouragement to continue running hard past the finish line.
Scoring: Two trials are allowed, and the best time is recorded to the nearest 2 decimal places. The timing starts from the first movement (if using a stopwatch) or when the timing system is triggered, and finishes when the chest crosses the finish line and/or the finishing timing gate is triggered.
Comments:
40 yards is 36.58 meters
L Test
Purpose: This is a test of agility, including speed, quickness, flexibility, change of direction, body control.
Equipment required: Stopwatch, measuring tape or marked football field, marker
cones, a flat non-slip surface.
Test layout: Three marker cones are placed to form an “L.” with cones at the corner and at each end, 5 yards apart (see diagram).

Procedure: The player starts by getting down in a three-point stance next to Cone
1. On the command ‘Go’, he runs to Cone 2, bends down and touches a line with his right hand . Then he turns and runs back to Cone 1, bends down and touches that line with his right hand. Then he runs back to Cone 2 and around the outside of it, weaves inside Cone 3, then around the outside of Cones 3 and 2 before finishing at Cone 1. The player must run forward while altering his running direction , as opposed to strictly stopping and starting in opposite directions . Each time they perform the 3-cone drill for a different side (e.g. first time they curve to the left, second time they curve to the right).
Scoring: The time to complete the test in seconds is recorded. The score is the best time of two trials.
20 Yards Shuttle
Purpose: This is a test of speed, explosion, body control and the ability to change direction (agility).
Equipment required: Stopwatch or timing gates, measuring tape or marked football field, 3 marker cones, a flat non-slip surface.
Test setup : Set up three marker cones in a straight line, exactly five yards apart – cones B, A (center) and C. At each cone place a line across using marking tape. The timer is positioned at the level of the center A cone, facing the athlete.
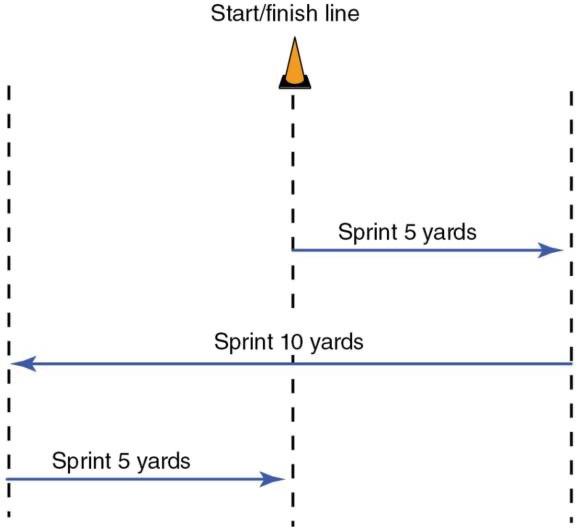
Procedure : Three marker cones are placed along a line five yards apart. The player straddles the middle line and puts one hand down in a three-point stance. The player can start by going either to the right or left direction. For example, on the signal ‘Go’ the player turns and runs five yards to the right side and touches the line with his right hand. He then runs 10 yards to his left and touches the other line with his left hand, then finally turns and finishes by running back through the start/finish line. The player is required to touch the line at each turn.
Scoring: The time to complete the test in seconds to the nearest two decimals is recorded. The score is the best time of three trials.
Comments: Turning technique and coordination is also a large factor in this test. This test is also called the Pro Agility Shuttle or 5-10-5 Shuttle. It is called the 20 yard shuttle as the total distance covered is 20 yards. 20 yards = 18.3 meters.
Height
Purpose: The measurement of height, from the feet to the top of the head, is a standard component of most fitness assessments. Height (or lack of height) is an important attribute for many sports.
Equipment required: Stadiometer (or steel ruler or tape measure placed against a wall)
Procedure: Standing height is the measurement the maximum distance from the floor to the highest point of the head, when the subject is facing directly ahead. Shoes should be off, feet together, and arms by the sides. Heels, buttocks and upper back should also be in contact with the wall when the measurement is made.
Comments: Height measurement can vary throughout the day, usually being higher in the morning, so to ensure reliability height should be measured at the same time of day.
Weight
Purpose: Measuring body mass can be valuable for monitoring body fat or muscle mass changes, or for monitoring hydration level.
Equipment required: Scales, which should be calibrated for accuracy using weights authenticated by a government department of weights and measures.
Procedure: The person stands with minimal movement with hands by their side. Shoes
and excess clothing should be removed.
Scoring: The time to complete the test in seconds to the nearest two decimals is recorded. The score is the best time of three trials.
Comments: To improve reliability, weigh routinely in the morning (12 hours since eating). Body weight can be affected by fluid in the bladder (weigh after voiding the bladder). Other factors to consider are the amount of food recently eaten, hydration level, the amount of waste recently expelled from the body, recent exercise and clothing. If you are monitoring changes in body mass, try and weigh at the same time of day, under the same conditions, and preferably with no clothes on. Always compare using the same set of scales.
Wingspan
Purpose: To measure arm length, as long arms may be advantageous for some sports
which involve reaching and tackling.
Equipment required: Ruler or tape measure, wall or floor.
Procedure: Facing away from the wall, with back and buttocks touching the arms are stretched out horizontally. Measure from one furthermost finger tip to the other.
Comments: The arm length measures can be compared to the person’s height. On average, arm span should be about equal to height. By subtracting a measurement for shoulder width from this measurement you can get a measure of average
arm length. Olympic swimming champion Michael Phelps may have a significant advantage due to his exceptional arm span measurement. His arm span was measured at 203cm, 10cm more than his stature. It is important for the subject to fully stretch to get the maximum reach, and that the arms are held exactly horizontally. To assist in keeping the outstretched arms horizontal, use a wall that has horizontal lines already on it such as a brick wall. Also measure out from a corner or wall protrusion so that one hand can be stable and all measurements are away from it.
Hand
Purpose: To measure the width and lenght of the hand
Equipment required: Flat surface and ruler or tape measure
Procedure: The hand is placed palm down on a flat surface. The fingers are outstretched as far as possible. Measure the linear distance between the outside of the thumb to the outside of the little finger. For the lenght just place your hand on a flat surface without outstretching your fingers. Measure the linear distance between the top of your fingers to the bottom of your hand
Appendices
Bench Press Technique
Technique
- Begin by lying flat on a bench, with your feet flat on the floor and buttocks and shoulders touching the bench.
- Grasp the bar at slightly wider than shoulder width apart (so that the elbows are at right angles at the lowest point).
- Start with the arms fully extended, holding the weight directly above the chest.
- The weight is lowered at a controlled speed and with a smooth motion, to just touch the chest then returned to the starting position.
Key points to remember
- Make sure that the back is not excessively arched, and that bar is not bounced on the chest.
- The bar should be kept horizontal so no particular arm does more work.
- You should not hold your breath during this exercise – breathe slowly in on the way down and out on the way up.
- A spotter, standing behind the athlete’s head, should always be used.

Vertical Jump Techniques
Squat Jump or Static Jump
In its simplest form, the vertical jump test is performed as a squat jump or static jump. In this technique, the subject starts from a stationary semi-squatting position, or pauses at the lower level of the squat before jumping upwards. This removes the factor of the stretch-shortening cycle (pre-stretching of muscles) and the jump result will be smaller than other techniques described below. The difference in jump height is typically 3-6 cm without a countermovement.
Countermovement Technique
The vertical jump test is commonly performed with a counter movement, where there is bending of the knees immediately prior to the jump. The countermovement activates the stretch-shortening cycle in the muscles, resulting in greater power production in the legs. Without the use of the arms, it makes it difficult to use the traditional technique of reaching up and touching the wall. The eTID VJ protocol is a countermovement test performed with no arm swinging, though the test is performed with one hand on the hip and the other raised above the head so as to reach up the wall. The Bosco Countermovement Jump test is performed on a touch sensitive mat, so the arms can be left on the hips throughout the jump.
Using the Arms
Using the arms during a vertical jump test is not always desirable, as it add variations due to technique and coordination, though most vertical jump tests you will see performed allow the use of the arms to help propel the body upwards, as well as a countermovement. Greater jump heights can be achieved with this method. In fact some measurement techniques are hard to conduct without the arms swinging, as they require that the arm is extended upwards to mark the wall or the vanes of the vertec can be hit. See the general vertical jump test description which gives the procedure for this method. Also see the Abalakov Jump Test, an example of the vertical jump using both arm movement and countermovement using a jump mat.
Vertical Jump Norms
Vertical Jump Norm Table
The table below categorizes the vertical jump height in centimeters and inches for adult men and women. This ranking scale is based on my observations, and will give a general idea of what is a good score.
| Male | Female | |||
|---|---|---|---|---|
Rating |
(inches) |
(cm) |
(inches) |
(cm) |
Excellent |
> 28 |
> 70 |
> 24 |
> 60 |
Very Good |
24-28 |
61-70 |
20-24 |
51-60 |
Above Average |
20-24 |
51-60 |
16-20 |
41-50 |
Average |
16-20 |
41-50 |
12-16 |
31-40 |
Below Average |
12-16 |
31-40 |
8-12 |
21-30 |
Poor |
8-12 |
21-30 |
4-8 |
11-20 |
Very Poor |
< 8 |
< 21 |
< 4 |
< 11 |
Broad Jump Norms
Warm up for speed testing
Example Warm Up
- Jog 1-2 km
- Stretches (lunges, quad stretch, calf stretch, side bend)
- Run throughs over 30-40 meters at gradually increasing speeds.
- Accelerations over 10-20 meters, including practicing taking off at maximum effort.
Modifications
Feel free to modify this procedure as you see fit. Depending on the environmental conditions, you may wish to extend of reduce the amount of warm up. In warm conditions, the subjects may already be somewhat ‘warmed-up’, but should still do the stretches and run throughs. In cold conditions they will obviously need an extended warm up.
You can modify the distance of the run throughs and accelerations to match the distance over which speed will be tested. You may also need to modify the warm up depending on what facilities and the amount of time you have available.
40 Yards Time Norms
40 yards dash Norm Table
The table below lists expected score ranges for players of different class.
| 40 yard Sprint Scores (General Guidelines) | Time in s |
|---|---|
College Footballers |
4,6 – 4,9 secs |
High School Footballers |
4,9 – 5,6 secs |
Recreational College Athletes (Male) |
~5,0 secs |
Recreational College Athletes (Female) |
~5,8 secs |

20 Yards Shuttle Norms

Check NFL Stats
Do not hesitate to compare your stats with those of NFL players by clicking on the button below:

